« SE3 PSE Binome2023-3 » : différence entre les versions
| (46 versions intermédiaires par 3 utilisateurs non affichées) | |||
| Ligne 1 : | Ligne 1 : | ||
= | [[Fichier:Titre page.png|centré|sans_cadre|1107x1107px]] | ||
= DESCRIPTION = | |||
Ce projet vise à développer une manette capable de réagir avec le jeu "Space Invaders" réalisé lors du projet info. | |||
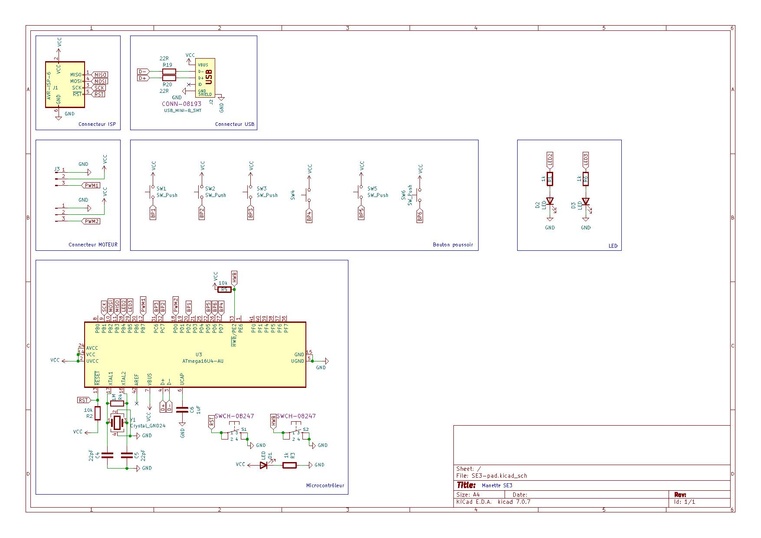
La manette est composé de 6 boutons poussoirs de deux LEDs et d'un microcontrôleur ATMEGA32U4. | |||
Le but de ce projet est d'utiliser la LIBUSB ainsi que la LUFA pour créer un périphérique USB. | |||
= CONCEPTION = | |||
== Schématique == | == Schématique == | ||
[[Fichier:SE3-pad-CART-DETREZ.pdf|sans_cadre| | [[Fichier:SE3-pad-CART-DETREZ.pdf|sans_cadre|761x761px]] | ||
== Routage == | |||
[[Fichier:Detrezcart.png|sans_cadre|774x774px]] | |||
== PINOUT == | == PINOUT == | ||
| Ligne 10 : | Ligne 22 : | ||
!PIN | !PIN | ||
|- | |- | ||
| | |BP_L | ||
|PD2 | |PD2 | ||
|- | |- | ||
| | |BP_A | ||
|PC7 | |PC7 | ||
|- | |- | ||
| | |BP_B | ||
|PC6 | |PC6 | ||
|- | |- | ||
| | |BP_D | ||
|PD7 | |PD7 | ||
|- | |- | ||
| | |BP_U | ||
|PD5 | |PD5 | ||
|- | |- | ||
| | |BP_R | ||
|PD6 | |PD6 | ||
|- | |- | ||
| Ligne 35 : | Ligne 47 : | ||
|} | |} | ||
== | = RÉALISATION = | ||
[[Fichier: | |||
== Brasage des composants sur le PCB == | |||
=== Brasage atmega32u4 sur le PCB: === | |||
[[Fichier:Zoom atmega.jpg|sans_cadre]] | |||
=== PCB avec atmega32u4, bouton reset et HWB: === | |||
[[Fichier:PCB avec atmega.jpg|sans_cadre]] | |||
=== PCB terminé: === | |||
[[Fichier:PCB fin.jpg|sans_cadre]] | |||
=== Correction de conception du PCB: === | |||
Suite à une mécompréhension du fonctionnement des boutons, ceux-ci sont reliés nativement au +5v et non à la masse. | |||
Nous avons donc coupé le cuivre entre J3 et J4 (empreintes de broche que nous n'utilisons pas) puis nous avons relié le cuivre à la masse de J3 afin de corriger notre erreur. | |||
[[Fichier:Correction_carte.jpg|sans_cadre|152x152px]][[Fichier:Corr PCB 2.jpg|sans_cadre|152x152px]] | |||
À la suite de cette modification la carte fonctionne parfaitement. | |||
== Programmation de l'atmega32u4 == | |||
=== Installation du bootloader via ISP: === | |||
Afin de pouvoir programmer le microcontrôleur, un bootloader est nécessaire et a donc été installé via un Arduino avec les broches ISP de notre carte. | |||
Pour téléverser un nouveau code sur le microcontrôleur, il faut appuyer sur les boutons HWB et RST simultanément. | |||
Après cela, le périphérique devrait apparaître sous le nom de "DFU bootloader" et vous pouvez compiler avec avr-gcc. | |||
[[Fichier:Arduino.jpg|sans_cadre]] | |||
=== Programmation des boutons et LEDs === | |||
==== Initialisation des boutons, LEDs et Endpoints: ==== | |||
<syntaxhighlight lang="c"> | |||
void BP_Init(void){ | |||
DDRC &= ~((1<<BP_A) | (1<<BP_B)); | |||
DDRD &= ~((1<<BP_RIGHT) | (1<<BP_LEFT) | (1<< BP_UP) | (1<<BP_DOWN)); | |||
PORTD |= ((1<<BP_RIGHT) | (1<<BP_LEFT) | (1<< BP_UP) | (1<<BP_DOWN)); | |||
PORTC |= ((1<<BP_A) | (1<<BP_B)); | |||
} | |||
void LED_Init(){ | |||
DDRB |= (1<<LED2)| (1<<LED3); //modification DDRD -> DDRB | |||
CLKSEL0 = 0b00010101; // sélection de l'horloge externe | |||
CLKSEL1 = 0b00001111; // minimum de 8Mhz | |||
CLKPR = 0b10000000; // modification du diviseur d'horloge (CLKPCE=1) | |||
CLKPR = 0; // 0 pour pas de diviseur (diviseur de 1) | |||
} | |||
void EVENT_USB_Device_ConfigurationChanged(void) | |||
{ | |||
Endpoint_ConfigureEndpoint(JOYSTICK_EPADDR, EP_TYPE_INTERRUPT, JOYSTICK_EPSIZE, 1); | |||
Endpoint_ConfigureEndpoint(LED_EPADDR, EP_TYPE_INTERRUPT, LED_EPSIZE, 1); | |||
} | |||
</syntaxhighlight> | |||
==== Envoi des données : ==== | |||
Pour envoyer des données, il y a plusieurs étapes à effectuer : | |||
* Sélectionner le Endpoint correspondant | |||
* Définir les données à envoyer avec GetNextReport() | |||
* Envoyer le message sur le Endpoint | |||
* Clear le Endpoint | |||
<syntaxhighlight lang="c"> | |||
void HID_Task(void) | |||
{ | |||
/* Device must be connected and configured for the task to run */ | |||
if (USB_DeviceState != DEVICE_STATE_Configured) | |||
return; | |||
/* Select the Joystick Report Endpoint */ | |||
Endpoint_SelectEndpoint(JOYSTICK_EPADDR); | |||
/* Check to see if the host is ready for another packet */ | |||
if (Endpoint_IsINReady()) | |||
{ | |||
USB_JoystickReport_Data_t JoystickReportData; | |||
/* Create the next HID report to send to the host */ | |||
GetNextReport(&JoystickReportData); | |||
/* Write Joystick Report Data */ | |||
Endpoint_Write_Stream_LE(&JoystickReportData, sizeof(JoystickReportData), NULL); | |||
/* Finalize the stream transfer to send the last packet */ | |||
Endpoint_ClearIN(); | |||
/* Clear the report data afterwards */ | |||
memset(&JoystickReportData, 0, sizeof(JoystickReportData)); | |||
} | |||
} | |||
bool GetNextReport(USB_JoystickReport_Data_t* const ReportData) | |||
{ | |||
static uint8_t PrevJoyStatus = 0; | |||
static uint8_t PrevButtonStatus = 0; | |||
bool InputChanged = false; | |||
/* Clear the report contents */ | |||
memset(ReportData, 0, sizeof(USB_JoystickReport_Data_t)); | |||
if(~(PIND>>BP_DOWN) & 1) ReportData->Y = -100; | |||
if(~(PIND>>BP_UP) & 1) ReportData->Y = 100; | |||
if(~(PIND>>BP_LEFT) & 1)ReportData->X = -100; | |||
if(~(PIND>>BP_RIGHT) & 1)ReportData->X = 100; | |||
if(~(PINC>>BP_A) & 1) ReportData->Button |= (1 << 0); | |||
if(~(PINC>>BP_B) & 1) ReportData->Button |= (1 << 1); | |||
/* Check if the new report is different to the previous report */ | |||
InputChanged = 1; | |||
/* Return whether the new report is different to the previous report or not */ | |||
return InputChanged; | |||
} | |||
</syntaxhighlight> | |||
==== Réception des données : ==== | |||
Pour recevoir des données, il y a plusieurs étapes : | |||
* Sélectionner le Endpoint correspondant | |||
* Lire le message reçu sur le Endpoint | |||
* Allumer les LEDs correspondant au message | |||
* Clear le Endpoint | |||
<syntaxhighlight lang="c"> | |||
void ReceiveNextReport(void) | |||
{ | |||
/* Select the Keyboard LED Report Endpoint */ | |||
Endpoint_SelectEndpoint(LED_EPADDR); | |||
/* Read in the LED report from the host */ | |||
uint8_t LEDReport = Endpoint_Read_8(); | |||
/* Process the read LED report from the host */ | |||
if (1 & LEDReport>>0) PORTB |= (1<<LED2); | |||
else PORTB &= ~(1<<LED2); | |||
if (1 & LEDReport>>1) PORTB |= (1<<LED3); | |||
else PORTB &= ~(1<<LED3); | |||
/* Handshake the OUT Endpoint - clear endpoint and ready for next report */ | |||
Endpoint_ClearOUT(); | |||
} | |||
</syntaxhighlight> | |||
=== Création des Interfaces et Endpoints === | |||
Il est important pour configurer une interface de définir "Class" , "SubClass" et "Protocol" avec les paramètre relatifs à leur fonction. | |||
Il ne faut pas oublier de mettre la bonne adresse de Endpoint.<syntaxhighlight lang="c"> | |||
const USB_Descriptor_Device_t PROGMEM DeviceDescriptor = | |||
{ | |||
.Header = {.Size = sizeof(USB_Descriptor_Device_t), .Type = DTYPE_Device}, | |||
.USBSpecification = VERSION_BCD(1,1,0), | |||
.Class = USB_CSCP_NoDeviceClass, | |||
.SubClass = USB_CSCP_NoDeviceSubclass, | |||
.Protocol = USB_CSCP_NoDeviceProtocol, | |||
.Endpoint0Size = FIXED_CONTROL_ENDPOINT_SIZE, | |||
.VendorID = 0x057e, | |||
.ProductID = 0x0306, | |||
.ReleaseNumber = VERSION_BCD(0,0,1), | |||
.ManufacturerStrIndex = STRING_ID_Manufacturer, | |||
.ProductStrIndex = STRING_ID_Product, | |||
.SerialNumStrIndex = NO_DESCRIPTOR, | |||
.NumberOfConfigurations = FIXED_NUM_CONFIGURATIONS | |||
}; | |||
const USB_Descriptor_Configuration_t PROGMEM ConfigurationDescriptor = | |||
{ | |||
.Config = | |||
{ | |||
.Header = {.Size = sizeof(USB_Descriptor_Configuration_Header_t), .Type = DTYPE_Configuration}, | |||
.TotalConfigurationSize = sizeof(USB_Descriptor_Configuration_t), | |||
.TotalInterfaces = 2, | |||
.ConfigurationNumber = 1, | |||
.ConfigurationStrIndex = NO_DESCRIPTOR, | |||
.ConfigAttributes = (USB_CONFIG_ATTR_RESERVED | USB_CONFIG_ATTR_SELFPOWERED), | |||
.MaxPowerConsumption = USB_CONFIG_POWER_MA(100) | |||
}, | |||
.HID_Interface_Joystick = | |||
{ | |||
.Header = {.Size = sizeof(USB_Descriptor_Interface_t), .Type = DTYPE_Interface}, | |||
.InterfaceNumber = INTERFACE_ID_Joystick, | |||
.AlternateSetting = 0x00, | |||
.TotalEndpoints = 1, | |||
.Class = HID_CSCP_HIDClass, | |||
.SubClass = HID_CSCP_NonBootSubclass, | |||
.Protocol = HID_CSCP_NonBootProtocol, | |||
.InterfaceStrIndex = NO_DESCRIPTOR | |||
}, | |||
.HID_JoystickHID = | |||
{ | |||
.Header = {.Size = sizeof(USB_HID_Descriptor_HID_t), .Type = HID_DTYPE_HID}, | |||
.HIDSpec = VERSION_BCD(1,1,1), | |||
.CountryCode = 0x00, | |||
.TotalReportDescriptors = 1, | |||
.HIDReportType = HID_DTYPE_Report, | |||
.HIDReportLength = sizeof(JoystickReport) | |||
}, | |||
.HID_ReportINEndpoint = | |||
{ | |||
.Header = {.Size = sizeof(USB_Descriptor_Endpoint_t), .Type = DTYPE_Endpoint}, | |||
.EndpointAddress = JOYSTICK_EPADDR, | |||
.Attributes = (EP_TYPE_INTERRUPT | ENDPOINT_ATTR_NO_SYNC | ENDPOINT_USAGE_DATA), | |||
.EndpointSize = JOYSTICK_EPSIZE, | |||
.PollingIntervalMS = 0x05 | |||
}, | |||
.HID_Interface_Led = | |||
{ | |||
.Header = {.Size = sizeof(USB_Descriptor_Interface_t), .Type = DTYPE_Interface}, | |||
.InterfaceNumber = INTERFACE_ID_LED, | |||
.AlternateSetting = 0x00, | |||
.TotalEndpoints = 1, | |||
.Class = USB_CSCP_VendorSpecificClass, | |||
.SubClass = USB_CSCP_VendorSpecificSubclass, | |||
.Protocol = USB_CSCP_VendorSpecificProtocol, | |||
.InterfaceStrIndex = NO_DESCRIPTOR | |||
}, | |||
.USB_Endpoint_OUT = | |||
{ | |||
.Header = {.Size = sizeof(USB_Descriptor_Endpoint_t), .Type = DTYPE_Endpoint}, | |||
.EndpointAddress = LED_EPADDR, | |||
.Attributes = (EP_TYPE_INTERRUPT | ENDPOINT_ATTR_NO_SYNC | ENDPOINT_USAGE_DATA), | |||
.EndpointSize = LED_EPSIZE, | |||
.PollingIntervalMS = 0x05 | |||
}, | |||
}; | |||
</syntaxhighlight> | |||
== Intégration de la manette dans le jeu == | |||
Voici le code qui se situe dans le jeu Space Invaders pour intégrer la manette. | |||
Les LEDs représentent le nombre de vie du vaisseau, soit 2 dans notre cas.<syntaxhighlight lang="c"> | |||
/*Ce code est purement à titre démonstratif pour ajouter la manette dans le jeu, il ne s'agit pas du jeu fonctionnel*/ | |||
int game() | |||
{ | |||
SDL_Joystick* Joystick = NULL; //On définit une manette. | |||
Joystick = SDL_JoystickOpen(0); //On choisit sa manette, 0 étant la première manette sur le PC. | |||
while(1) | |||
{ | |||
int b_tir = SDL_JoystickGetButton(Joystick, 1); | |||
/*Cette fonction prend en paramètre la manette ainsi que le bouton et renvoie 1 si le bouton est appuyé, 0 sinon.*/ | |||
int b_quit = SDL_JoystickGetButton(Joystick, 0); //idem | |||
int b_x = SDL_JoystickGetAxis(Joystick, 0); | |||
/*Cette fonction prend en paramètre la manette ainsi que l'axe et retourne 32768 si l'axe est totalement à droite (haut pour Y) | |||
et -32768 à gauche (bas pour Y). Au point mort, l'axe retourne 0.*/ | |||
if(b_quit == 1) quitter_le_jeu(); | |||
if(b_x > 0) deplacement_monstres_droite(); | |||
if(b_x < 0) deplacement_monstres_gauche(); | |||
if(b_tir == 1) tir_missile(); | |||
} | |||
return 0; | |||
} | |||
/* la fonction Led_control permet d'allumer ou d'eteindre les LEDs : | |||
0x00 est le message pour éteindre les LEDs. | |||
0x01 est le message pour allumer la LED gauche. | |||
0x02 est le message pour allumer la LED droite. | |||
0x03 est le message pour allumer les 2 LEDs.*/ | |||
int Led_control(int message) { | |||
libusb_context *context = NULL; | |||
int status = libusb_init(&context); | |||
if (status != 0) { | |||
perror("libusb_init"); | |||
exit(-1); | |||
} | |||
libusb_device *manette = NULL; | |||
libusb_device_handle *handle = NULL; | |||
struct libusb_config_descriptor *configdesc; | |||
FindDevice(&manette, &handle, configdesc, context); | |||
//cette fonction permet de trouver la manette à qui il faut envoyer le message. | |||
ConfigDevice(manette, handle, &configdesc); | |||
//cette fonction permet de récupérer la configuration de la manette. | |||
Send_message(message, manette, handle, configdesc); | |||
libusb_close(handle); | |||
libusb_exit(context); | |||
return 0; | |||
} | |||
void Send_message(unsigned char message, libusb_device *manette, libusb_device_handle *handle, struct libusb_config_descriptor *configdesc) | |||
{ | |||
int indint=1; | |||
int indalt=0; | |||
int interface=configdesc->interface[indint].altsetting[indalt].bInterfaceNumber; | |||
int status=libusb_claim_interface(handle,interface); | |||
if(status!=0) | |||
{ | |||
printf("bij\n"); | |||
perror("libusb_claim_interface"); | |||
exit(-1); | |||
} | |||
int transferred; | |||
status = libusb_interrupt_transfer(handle, ENDPOINT_OUT, &message, sizeof(message), &transferred, 0); | |||
if (status == 0) { | |||
} else { | |||
fprintf(stderr, "Erreur lors de l'envoi de données au périphérique USB: %s\n", libusb_error_name(status)); | |||
} | |||
status=libusb_release_interface(handle,interface); | |||
if(status!=0) | |||
{ | |||
perror("libusb_release_interface"); | |||
exit(-1); | |||
} | |||
} | |||
</syntaxhighlight> | |||
= TEST = | |||
=== Vidéo de test du clignotement des LEDs de vie: === | |||
[[Fichier:Vidéo_LED.mp4|sans_cadre]] | |||
=== Vidéo de test d'allumage d'une LED avec un bouton: === | |||
[[Fichier:Vidéo LED bouton.mp4|sans_cadre]] | |||
=== Vidéo de test du Space Invaders avec la manette sans LEDs: === | |||
[[Fichier:Space avec manette.mp4|sans_cadre]] | |||
=== Vidéo de test du Space Invaders avec la manette avec LEDs: === | |||
[[Fichier:Manette avec led.mp4|sans_cadre]] | |||
= À PROPOS DE LA MANETTE = | |||
=== Informations générales: === | |||
idVendor : 0x057e | |||
idProduct : 0x0306 | |||
=== Mode d'emploi: === | |||
[[Fichier:MANETTE BOUTON.jpg|sans_cadre|366x366px]] | |||
Bouton A : Quitter le jeu | |||
Bouton B: Tirer un missile | |||
Bouton R : Aller vers la droite | |||
Bouton L : Aller vers la gauche | |||
=ARCHIVE = | |||
Archive KiCad Manette : [[Fichier:CARTDETREZ.zip|vignette|néant]] | |||
Archive programmation USB : https://archives.plil.fr/vdetrez/PSE_Manette_CART_DETREZ.git | |||
https:// | Tuto : https://rex.plil.fr/Enseignement/Systeme/Systeme.PSE/systeme033.html | ||
Version actuelle datée du 10 juin 2024 à 15:02

DESCRIPTION
Ce projet vise à développer une manette capable de réagir avec le jeu "Space Invaders" réalisé lors du projet info.
La manette est composé de 6 boutons poussoirs de deux LEDs et d'un microcontrôleur ATMEGA32U4.
Le but de ce projet est d'utiliser la LIBUSB ainsi que la LUFA pour créer un périphérique USB.
CONCEPTION
Schématique
Routage

PINOUT
| NOM | PIN |
|---|---|
| BP_L | PD2 |
| BP_A | PC7 |
| BP_B | PC6 |
| BP_D | PD7 |
| BP_U | PD5 |
| BP_R | PD6 |
| LED2 | PB4 |
| LED3 | PB5 |
RÉALISATION
Brasage des composants sur le PCB
Brasage atmega32u4 sur le PCB:

PCB avec atmega32u4, bouton reset et HWB:

PCB terminé:

Correction de conception du PCB:
Suite à une mécompréhension du fonctionnement des boutons, ceux-ci sont reliés nativement au +5v et non à la masse.
Nous avons donc coupé le cuivre entre J3 et J4 (empreintes de broche que nous n'utilisons pas) puis nous avons relié le cuivre à la masse de J3 afin de corriger notre erreur.


À la suite de cette modification la carte fonctionne parfaitement.
Programmation de l'atmega32u4
Installation du bootloader via ISP:
Afin de pouvoir programmer le microcontrôleur, un bootloader est nécessaire et a donc été installé via un Arduino avec les broches ISP de notre carte.
Pour téléverser un nouveau code sur le microcontrôleur, il faut appuyer sur les boutons HWB et RST simultanément.
Après cela, le périphérique devrait apparaître sous le nom de "DFU bootloader" et vous pouvez compiler avec avr-gcc.

Programmation des boutons et LEDs
Initialisation des boutons, LEDs et Endpoints:
void BP_Init(void){
	DDRC &= ~((1<<BP_A) | (1<<BP_B));
	DDRD &= ~((1<<BP_RIGHT) | (1<<BP_LEFT)  | (1<< BP_UP) | (1<<BP_DOWN));
	PORTD |= ((1<<BP_RIGHT) | (1<<BP_LEFT)  | (1<< BP_UP) | (1<<BP_DOWN));
	PORTC |= ((1<<BP_A) | (1<<BP_B));
}

void LED_Init(){
    DDRB |= (1<<LED2)| (1<<LED3); //modification DDRD -> DDRB
    CLKSEL0 = 0b00010101;   // sélection de l'horloge externe
    CLKSEL1 = 0b00001111;   // minimum de 8Mhz
    CLKPR = 0b10000000;     // modification du diviseur d'horloge (CLKPCE=1)
    CLKPR = 0;              // 0 pour pas de diviseur (diviseur de 1)
}

void EVENT_USB_Device_ConfigurationChanged(void)
{
	Endpoint_ConfigureEndpoint(JOYSTICK_EPADDR, EP_TYPE_INTERRUPT, JOYSTICK_EPSIZE, 1);
	Endpoint_ConfigureEndpoint(LED_EPADDR, EP_TYPE_INTERRUPT, LED_EPSIZE, 1);
}
Envoi des données :
Pour envoyer des données, il y a plusieurs étapes à effectuer :
- Sélectionner le Endpoint correspondant
- Définir les données à envoyer avec GetNextReport()
- Envoyer le message sur le Endpoint
- Clear le Endpoint
void HID_Task(void)
{
	/* Device must be connected and configured for the task to run */
	if (USB_DeviceState != DEVICE_STATE_Configured)
	  return;

	/* Select the Joystick Report Endpoint */
	Endpoint_SelectEndpoint(JOYSTICK_EPADDR);

	/* Check to see if the host is ready for another packet */
	if (Endpoint_IsINReady())
	{
		USB_JoystickReport_Data_t JoystickReportData;

		/* Create the next HID report to send to the host */
		GetNextReport(&JoystickReportData);

		/* Write Joystick Report Data */
		Endpoint_Write_Stream_LE(&JoystickReportData, sizeof(JoystickReportData), NULL);

		/* Finalize the stream transfer to send the last packet */
		Endpoint_ClearIN();

		/* Clear the report data afterwards */
		memset(&JoystickReportData, 0, sizeof(JoystickReportData));
	}
}

bool GetNextReport(USB_JoystickReport_Data_t* const ReportData)
{
	static uint8_t PrevJoyStatus    = 0;
	static uint8_t PrevButtonStatus = 0;
	bool           InputChanged     = false;

	/* Clear the report contents */
	memset(ReportData, 0, sizeof(USB_JoystickReport_Data_t));

	if(~(PIND>>BP_DOWN) & 1) ReportData->Y = -100;
	if(~(PIND>>BP_UP) & 1) ReportData->Y =  100;
	if(~(PIND>>BP_LEFT) & 1)ReportData->X = -100;
	if(~(PIND>>BP_RIGHT) & 1)ReportData->X =  100;
	if(~(PINC>>BP_A) & 1) ReportData->Button |= (1 << 0);
	if(~(PINC>>BP_B) & 1) ReportData->Button |= (1 << 1);


	/* Check if the new report is different to the previous report */
	InputChanged = 1;

	/* Return whether the new report is different to the previous report or not */
	return InputChanged;
}
Réception des données :
Pour recevoir des données, il y a plusieurs étapes :
- Sélectionner le Endpoint correspondant
- Lire le message reçu sur le Endpoint
- Allumer les LEDs correspondant au message
- Clear le Endpoint
void ReceiveNextReport(void)
{
	/* Select the Keyboard LED Report Endpoint */
	Endpoint_SelectEndpoint(LED_EPADDR);

	/* Read in the LED report from the host */
	uint8_t LEDReport = Endpoint_Read_8();

	/* Process the read LED report from the host */
	if (1 & LEDReport>>0) PORTB |= (1<<LED2);
	else PORTB &= ~(1<<LED2);
	if (1 & LEDReport>>1) PORTB |= (1<<LED3);
	else PORTB &= ~(1<<LED3);

	/* Handshake the OUT Endpoint - clear endpoint and ready for next report */
	Endpoint_ClearOUT();
}
Création des Interfaces et Endpoints
Il est important pour configurer une interface de définir "Class" , "SubClass" et "Protocol" avec les paramètre relatifs à leur fonction.
Il ne faut pas oublier de mettre la bonne adresse de Endpoint.
const USB_Descriptor_Device_t PROGMEM DeviceDescriptor =
{
	.Header                 = {.Size = sizeof(USB_Descriptor_Device_t), .Type = DTYPE_Device},

	.USBSpecification       = VERSION_BCD(1,1,0),
	.Class                  = USB_CSCP_NoDeviceClass,
	.SubClass               = USB_CSCP_NoDeviceSubclass,
	.Protocol               = USB_CSCP_NoDeviceProtocol,

	.Endpoint0Size          = FIXED_CONTROL_ENDPOINT_SIZE,

	.VendorID               = 0x057e,
	.ProductID              = 0x0306,
	.ReleaseNumber          = VERSION_BCD(0,0,1),

	.ManufacturerStrIndex   = STRING_ID_Manufacturer,
	.ProductStrIndex        = STRING_ID_Product,
	.SerialNumStrIndex      = NO_DESCRIPTOR,

	.NumberOfConfigurations = FIXED_NUM_CONFIGURATIONS
};

const USB_Descriptor_Configuration_t PROGMEM ConfigurationDescriptor =
{
	.Config =
		{
			.Header                 = {.Size = sizeof(USB_Descriptor_Configuration_Header_t), .Type = DTYPE_Configuration},

			.TotalConfigurationSize = sizeof(USB_Descriptor_Configuration_t),
			.TotalInterfaces        = 2,

			.ConfigurationNumber    = 1,
			.ConfigurationStrIndex  = NO_DESCRIPTOR,

			.ConfigAttributes       = (USB_CONFIG_ATTR_RESERVED | USB_CONFIG_ATTR_SELFPOWERED),

			.MaxPowerConsumption    = USB_CONFIG_POWER_MA(100)
		},

	.HID_Interface_Joystick =
		{
			.Header                 = {.Size = sizeof(USB_Descriptor_Interface_t), .Type = DTYPE_Interface},

			.InterfaceNumber        = INTERFACE_ID_Joystick,
			.AlternateSetting       = 0x00,

			.TotalEndpoints         = 1,

			.Class                  = HID_CSCP_HIDClass,
			.SubClass               = HID_CSCP_NonBootSubclass,
			.Protocol               = HID_CSCP_NonBootProtocol,

			.InterfaceStrIndex      = NO_DESCRIPTOR
		},

	.HID_JoystickHID =
		{
			.Header                 = {.Size = sizeof(USB_HID_Descriptor_HID_t), .Type = HID_DTYPE_HID},

			.HIDSpec                = VERSION_BCD(1,1,1),
			.CountryCode            = 0x00,
			.TotalReportDescriptors = 1,
			.HIDReportType          = HID_DTYPE_Report,
			.HIDReportLength        = sizeof(JoystickReport)
		},

	.HID_ReportINEndpoint =
		{
			.Header                 = {.Size = sizeof(USB_Descriptor_Endpoint_t), .Type = DTYPE_Endpoint},

			.EndpointAddress        = JOYSTICK_EPADDR,
			.Attributes             = (EP_TYPE_INTERRUPT | ENDPOINT_ATTR_NO_SYNC | ENDPOINT_USAGE_DATA),
			.EndpointSize           = JOYSTICK_EPSIZE,
			.PollingIntervalMS      = 0x05
		},

	.HID_Interface_Led =
		{
			.Header                 = {.Size = sizeof(USB_Descriptor_Interface_t), .Type = DTYPE_Interface},

			.InterfaceNumber        = INTERFACE_ID_LED,
			.AlternateSetting       = 0x00,

			.TotalEndpoints         = 1,

			.Class                  = USB_CSCP_VendorSpecificClass,
			.SubClass               = USB_CSCP_VendorSpecificSubclass,
			.Protocol               = USB_CSCP_VendorSpecificProtocol,

			.InterfaceStrIndex      = NO_DESCRIPTOR
		},

	.USB_Endpoint_OUT =
		{
			.Header                 = {.Size = sizeof(USB_Descriptor_Endpoint_t), .Type = DTYPE_Endpoint},

			.EndpointAddress        = LED_EPADDR,
			.Attributes             = (EP_TYPE_INTERRUPT | ENDPOINT_ATTR_NO_SYNC | ENDPOINT_USAGE_DATA),
			.EndpointSize           = LED_EPSIZE,
			.PollingIntervalMS      = 0x05
		},
};
Intégration de la manette dans le jeu
Voici le code qui se situe dans le jeu Space Invaders pour intégrer la manette.
Les LEDs représentent le nombre de vie du vaisseau, soit 2 dans notre cas.
/*Ce code est purement à titre démonstratif pour ajouter la manette dans le jeu, il ne s'agit pas du jeu fonctionnel*/
int game()
{

    SDL_Joystick* Joystick = NULL; //On définit une manette.
    Joystick = SDL_JoystickOpen(0); //On choisit sa manette, 0 étant la première manette sur le PC.

    while(1)
    {
        int b_tir = SDL_JoystickGetButton(Joystick, 1);
        /*Cette fonction prend en paramètre la manette ainsi que le bouton et renvoie 1 si le bouton est appuyé, 0 sinon.*/

        int b_quit = SDL_JoystickGetButton(Joystick, 0); //idem

        int b_x = SDL_JoystickGetAxis(Joystick, 0);
        /*Cette fonction prend en paramètre la manette ainsi que l'axe et retourne 32768 si l'axe est totalement à droite (haut pour Y)
        et -32768 à gauche (bas pour Y). Au point mort, l'axe retourne 0.*/

        if(b_quit == 1) quitter_le_jeu();
        if(b_x > 0) deplacement_monstres_droite();
        if(b_x < 0) deplacement_monstres_gauche();
        if(b_tir == 1) tir_missile();
    }
    return 0;
}


/* la fonction Led_control permet d'allumer ou d'eteindre les LEDs :
0x00 est le message pour éteindre les LEDs.
0x01 est le message pour allumer la LED gauche.
0x02 est le message pour allumer la LED droite.
0x03 est le message pour allumer les 2 LEDs.*/

int Led_control(int message) {

    libusb_context *context = NULL;
    int status = libusb_init(&context);
    if (status != 0) {
        perror("libusb_init");
        exit(-1);
    }

    libusb_device *manette = NULL;
    libusb_device_handle *handle = NULL;
    struct libusb_config_descriptor *configdesc;
    FindDevice(&manette, &handle, configdesc, context);
    //cette fonction permet de trouver la manette à qui il faut envoyer le message.

    ConfigDevice(manette, handle, &configdesc);
    //cette fonction permet de récupérer la configuration de la manette.

    Send_message(message, manette, handle, configdesc);

    libusb_close(handle);
    libusb_exit(context);

    return 0;
}

void Send_message(unsigned char message, libusb_device *manette, libusb_device_handle *handle, struct libusb_config_descriptor *configdesc)
{
    int indint=1;
    int indalt=0;
    int interface=configdesc->interface[indint].altsetting[indalt].bInterfaceNumber;
    int status=libusb_claim_interface(handle,interface);

    if(status!=0)
    {
            printf("bij\n");
        perror("libusb_claim_interface");
        exit(-1);
    }

    int transferred;
    status = libusb_interrupt_transfer(handle, ENDPOINT_OUT, &message, sizeof(message), &transferred, 0);
    if (status == 0) {

    } else {
        fprintf(stderr, "Erreur lors de l'envoi de données au périphérique USB: %s\n", libusb_error_name(status));
    }

    status=libusb_release_interface(handle,interface);
    if(status!=0)
    {
        perror("libusb_release_interface");
        exit(-1);
    }
}
TEST
Vidéo de test du clignotement des LEDs de vie:
Vidéo de test d'allumage d'une LED avec un bouton:
Vidéo de test du Space Invaders avec la manette sans LEDs:
Vidéo de test du Space Invaders avec la manette avec LEDs:
À PROPOS DE LA MANETTE
Informations générales:
idVendor : 0x057e
idProduct : 0x0306
Mode d'emploi:

Bouton A : Quitter le jeu
Bouton B: Tirer un missile
Bouton R : Aller vers la droite
Bouton L : Aller vers la gauche
ARCHIVE
Archive KiCad Manette : Fichier:CARTDETREZ.zip
Archive programmation USB : https://archives.plil.fr/vdetrez/PSE_Manette_CART_DETREZ.git
Tuto : https://rex.plil.fr/Enseignement/Systeme/Systeme.PSE/systeme033.html